From VenturaPublications.com
Fairey Battle, engine test bed, conversion. Classic Airframe. 1/72nd
By Derek pennington. IPMS Canada. d.pennington@sympatico.ca
Apr 20, 2006, 09:38
The Fairey Battle was not a success for the role in which it was designed. History has shown as much, but despite this, it was a competent airframe, being easy to fly, strong, and in the right hands, with plenty of sky, fully aerobatic!
With the advent of the newer, higher- powered engines being planned, a need arose during 1938-39 for a suitable airframe to test fly these engines. Being plentiful, the Battle was the obvious choice, so a number of airframes were set aside for conversion.
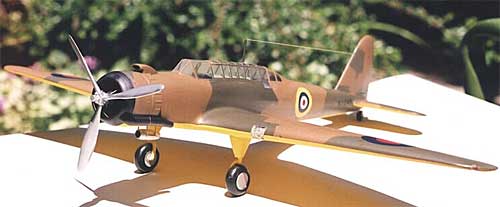
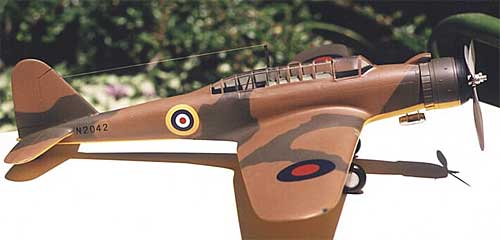
Bristols had a need for such a machine to test the latest versions of the Hercules, which was proposed for the Short Stirling and the Bristol Beaufighter, so two aircraft were allocated for this work. It was obvious that the engines would turn the aircraft into a hotrod, so some form of drag was needed, if the engines were to run at full power. In the case of the Battle, the undercarriage was fixed down, and faired in. Being somewhat light than the Merlin, the firewall for the Hercules was extended slightly.
What sparked this conversion was a profile photo of the Hercules-Battle in the Profile series of publications. I had engines and cowlings left over from the Tamiya Beaufighter conversion ( Mark 2, with Merlins) and a Classic Airframe Battle in the 'To do' pile. Plus one of the modellers in England had sent me a resin part that looked after the fin and rudder of the CA kit, which did not have the offset, and the 'flying fin'.
The conversion began by taping the fuselage halves together, and cutting off the tail as indicated on the instructions which accompanied the resin piece. This was going to fit well, the panel lines on the resin piece lining up nicely with those of the kit.
The cockpits were installed, painted, and the fuselage glued together. Not too much time was spent on this. By looking at the photo in the Profile, and doing some comparisons, I found that the distance between the windshield and the cooling gills of the engine was the same length as the engine cowling and the gills. This gave me the line to cut off the Merlin, which went through the radiator area. Since the Hercules is air-cooled the rad was obviously removed. On the model, I filled this gap by the simple expedient of scoring around the remains of the radiator and pushing it up into the hole! Some filing was needed, using plasticard and cyano. A firewall was made out of plasticard, and glued to the forward edge of the nose. The engine from the Tamiya kit was wedged inside the cowling and this was test fitted to the firewall. Seemed OK. The exhaust on the Battle was located on the left side of the engine, which meant that the cooling gills had to be cut away on that side. These were used to fill the gap left by the absent exhaust, plus the gills at the top of the engine were slightly modified to accommodate the carb intake. I would use the Beaufighter prop, and attach the prop pitch change counterbalances as supplied in resin from the Battle kit. This all worked out fine.
The fixed undercarriage merely faired in the retraction struts. Also, the undercarriage wells were obviously filled in, so this was done with plasticard. By doing some comparisons with the wheel width, I could work out the size of the fairing, which I made from the upper panels of the wings of an Airfix 109. The 109 had sacrificed its engines to make a What If? Finish Mosquito!! The shape of the fairings was determined by a photo taken from a photo in the Air Britain book on the Battle, this was provided by one of the modellers from Hyper Scale..
At one of the IPMS Toronto meetings, I had laid the kit on a table with the engine taped to the front, and someone asked me why I was scratch -building a Kate! It was only after I explained what was happening that this person looked convinced.
It was at this stage that the canopy was test fitted to the model. It was obvious that there was going to be some work to be done. If I got it to fit at the front, it didn't fit at the rear. And vice versa. In the end I went with fitting it at the rear and 'persuading' it to go with the rest of the fuselage. Masking it off for painting took a whole evening.
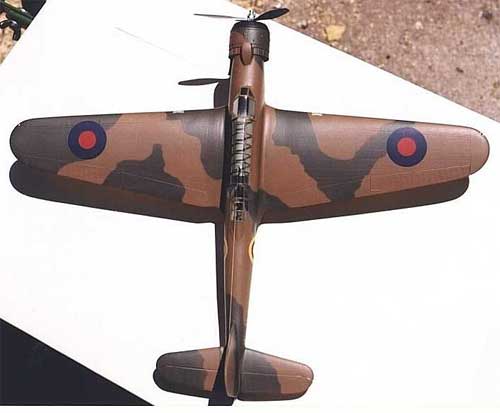
The colour scheme was simple. Dark Green and Dark Earth uppers and yellow undersides. No prototype markings were applied. I have a scan of a Battle pre-War taken directly overhead which shows the pattern beautifully, this I printed out.
Once painted, using Humbrol, I used the kit decals for the fuselage, and some spares for the wings, which were quite large. The serial number came from the decal chest, the aerial mast was installed and the wire strung using Lycra Knitting Elastic.
The completed engine and prop was simply glued to the front, and the exhaust made from some plastic tube, stretched and formed in the heat of a boiling kettle…
While not a contest winner, (it didn't place at Capcon a model contest in Ottawa!) it does look different. And it used up one of the spare engines from the Beau kit, plus I didn't have to tackle the problem of the mis-shapened nose on the Battle kit.
Now, if I can only find a Trainer Battle at a decent price, there is one that Fairchild of Canada modified to take a Wright Cyclone. In overall yellow, it will look striking…
© Copyright 2004-2013 VenturaPublications.com and contributors.
|