From VenturaPublications.com
Fokker F.1. Roden kit 017. 1/72nd
By Clarence Wentzel. IPMS USA
Apr 16, 2006, 10:47
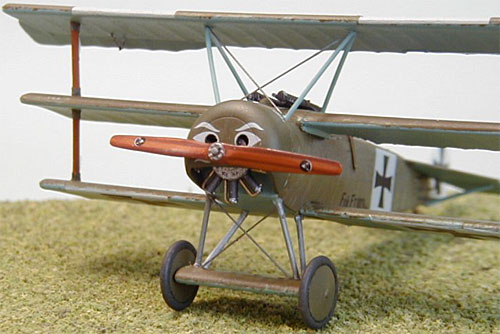
Roden have recently added to the excellent line of well executed World War I aircraft that they received from Toko. Two of the new models are the Fokker Dr.1 and the Fokker F.1. F.1 was the designation initially given to the Fokker Triplane and was applied to the first four aircraft. Two of these, numbers 102 and 103, were sent to the front for in-service testing and were assigned to Jasta 11. Number 102 was flown by Manfred von Richthofen and also by the Oblt. Kurt Wolff. Oblt. Wolff was killed in this aircraft. Number 103 was flown by Lt. Werner Voss who scored several victories before losing his life in an epic battle with six British aces from 56 Squadron flying SE-5 fighters. Voss inflicted damage, some serious on all of the aircraft before falling victim to the guns of Lt. Arthur Rhys-Davids. Afterwards, Maj. McCudden said; "His flying was wonderful, his courage magnificent and in my opinion he is the bravest German airman whom it has been my privilege to see fight". I had to add Voss' airplane to my collection.
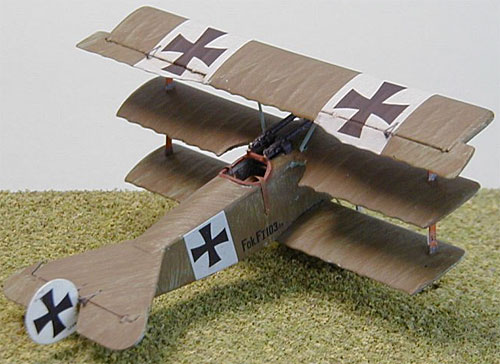
The F.1 differed externally from the Dr.1 by having different shaped ailerons, a curved shape to the horizontal stabilizer, and the lack of wing tip skids. As a reference, I utilized the Windsock Datafile Special - Fokker Dr.1. Very good multiple view drawings are provided in 1/48 and 1/72 scale. The Roden kit provides two sets of ailerons, the correct F.1 version and also one used on later Dr.1 models. A check against the three view in the datafile indicated that the model was accurate in dimension and outline except that the curved edges of the horizontal stabilizer were not provided. I performed some minor reshaping of the kit part but it is not exactly correct. I would have to scratch build a new part be 100% accurate. I chose not to. The kit provides a good representation of the welded tube structure inside the fuselage as well as reasonable representations of the throttle and other interior instruments. The only addition that I made was to add stretched sprue to represent diagonal wire bracing. I have read reviews that indicated that the cowling is not correct for the F.1 but I was unable to find any fault with the kit parts.
The sequence that I used was to build the fuselage first. I installed parts 15 and 16 before assembling the two fuselage halves. Also, remember to install part 3 before mounting the middle wing. With the fuselage and cockpit complete, I then mounted the middle wing. It mounts solidly onto the fuselage and is easy to get level and straight. When dry, I turned the assembly upside down and prepared to glue the lower wings in place. The struts and lower wings were then added and were visually aligned, horizontally, vertically and fore and aft. Make sure that both struts are the same angle. When this assembly is dry, I added the upper wings, using only the struts initially. Again, make sure that all wings are aligned. I then planned to add the cabane struts to the correctly aligned assembly. I was not able to separate these parts from the sprue so I used stretched sprue to provide the cabanes. The remainder of the parts went together well.
The directions from Roden indicated that the airplane was painted matt steel gray overall with olive drab hand brushed over the upper surfaces. They also directed to paint the cowl and wheel hubs matt red brown. Most references that I have seen indicate that Fokker Triplanes were painted a turquoise overall. I had the Methuen references from the Dr.1 book and which were reportedly taken from samples of Fokker Dr.1 fabric. Another good reference book, "Windsock Fabric Special no.1, von Richthofen's Flying Circus", confirms the Methuen values and provides F.S. approximations. Turquoise was listed as FS 24241 while Olive Brown was listed as 14084. I mixed the turquoise from Testors Model Masters enamels using 50% no. 1722 Duck Egg Blue, 30% no. 1108 Light Blue (the square bottle) and 20% no. 1716 Pale Green. I used Aeromaster no. 9040 Olive Drab for the hand painted over coat. I used a stiff ˝ inch wide brush to apply the OD. I used a coat of Future between the turquoise and the OD to prevent mixing of the colors.
Most references had previously indicated that the cowl of Lt. Voss' F.1 was overall Olive Brown although one reference indicated that it was yellow, a marking of Jasta 11. Following a review of all my available photos I concluded that his cowl must be Olive Brown. This color best matched the hand painted over color and provided a difference to the fact that was painted on Voss' cowl.
Being in a masochistic mood, I checked out the flying wire configuration of the F.1. It seemed simple so I added the cross bracing wires to the undercarriage and to the upper wing from thin stainless steel wire. The horizontal stabilizer had two holes for control wires to go through and the fuselage indicated the location of all of the rudder and elevator cables. As a result, I added short horns to the ailerons, elevators and rudder and glued short lengths of wire at all locations. Easier said than done but an improvement to the looks of the model. When I build another Dr.1 for my collection, I will plan ahead and glue the horns to the control surfaces early so that they are stronger and better aligned.
All in all, I was pleased with this kit and the final appearance of the model. I will be adding more Dr.1s and other Toko/Roden models to my collection.
© Copyright 2004-2013 VenturaPublications.com and contributors.
|