From VenturaPublications.com
Fokker D.VIIF (Late Model). Roden kit 31. 1/72nd
By Clarence Wentzel. IPMS USA
Apr 16, 2006, 10:56
The Fokker D.VII came from a January, 1918 fighter competition at Adlershof, near Berlin. One of the visitors to the competition was Baron von Richthofen who was delighted with the D.VII. The airplane featured welded steel tubing as the main structural material and internally braced cantilever wings without external, drag producing wire bracing and had better performance than contemporary allied foes.
The Idflieg, the German Inspectorate of Aviation Troops declared the D.VII the winner and directed Fokker to start production. In addition Albatros Werke and Ostdeutsche Albatros Werke (OAW) were ordered to product the D.VII under license. The D.VII made a great impression when it entered combat. At the end of the war, Germany was not allowed to have an air force or manufacture aircraft and the D.VII was specifically mentioned in the Armistice Treaty. All D.VIIs had to be confiscated or destroyed. As a result, examples of the D.VII found their way to many different air forces.
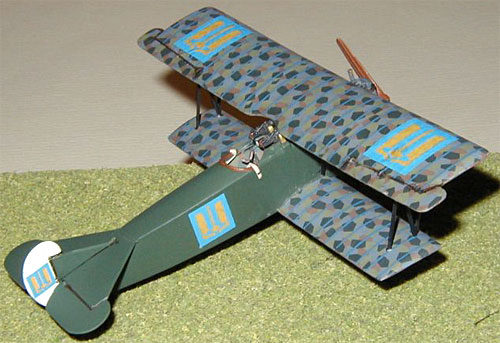
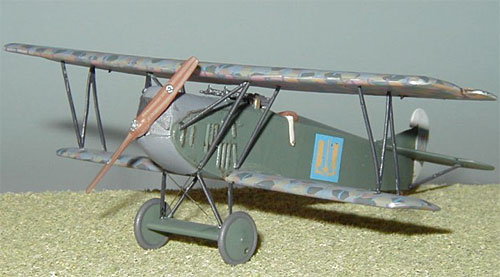
Recent additions to the model line-up from the Ukrainian Company Roden include various models of the Fokker D.VII. These include early and late versions of Fokker built aircraft as well as an OAW built model. I chose to build the late model D.VIIF. The 185-hp BMW engine powered this model. Markings supplied with the kit include an all white D.VII of Herman Göring as well as aircraft in the markings of the Ukraine, Netherlands, Russia Red Army and Lithuania. A great model for Small Air Force fans.
I started building the model with enthusiasm. The kit moldings looked good and the fuselage featured some internal detail that allowed for easy detailing. The cockpit was well detailed for a 1/72 scale WW I model and a good representation of the engine was included. A check of parts to available drawings indicated good accuracy. I chose to build the model in the markings of the Ukrainian Air Force. The kit indicated that the wings should be painted dark green along with the fuselage. The December 1996 issue of Insignia magazine showed a profile of the same aircraft but noted that the wings were covered in German Lozenge fabric. Since the Ukrainian insignia seemed to be sized to cover old German insignia, I chose to follow the recommendation of Insignia. It also gave me an opportunity to use some of the neat decals from Americal Gryphon. I built the fuselage as directed except that I added some thin wire to simulate fuselage internal bracing and I trimmed the machine gun cartridge feed chutes to be more accurate. I added the Americal interior lozenge to the inside and then lightly sprayed a tan over the decal. I reasoned that the fabric pattern would still show even though the outside was painted green. The lower wing was molded to include a wing spar going through notches on each side of the fuselage. Unfortunately the fuselage was wider than the provisions in the wing. I solved the problem by splitting the lower wing and adding enough material to allow it to fit the fuselage. A little sanding of the wing tips brought everything back to scale.
Next I painted the fuselage and horizontal tail and then started decaling the wings. My results with the Americal decals were not perfect. They seemed to react poorly to Micro Sol. I could not get them to set down well. A few small wrinkles remained. When I started to assemble the top wing and the wheels, my problems began. The mounting locations were vague at best and the struts were extremely fragile. The "N" interplane struts were broken in two places on the sprue. After gluing them back together as well as possible, I concluded that the best way to assemble the model was to jig the top wing in place and then install the interplane struts. When they were dry, I would install the cabane struts individually, cutting them to the correct length. I used the same procedure for the landing gear. The results were ok but not perfect. I would have preferred better mounting provisions. My landing gear is a little crooked but doesn't show unless you look too close. The final result is not a contest model but does fill a blank in my collection. Another problem was the exhaust system. I didn't glue the exhaust system in place when I built the engine into the fuselage because I thought that it would interfere with painting the fuselage. As a result, the exhaust didn't fit when I finally tried to install it. I suggest painting the portion of the fuselage below the exhaust before fuselage assembly and then assemble the exhaust to the engine before installing the engine.
I think that with more planning, I could build a better D.VII and I probably will build more of this range. I will make certain that I drill all mounting holes before final assembly. Final opinion - not a perfect kit but can be made into a good model. Recommended with the above reservations.
© Copyright 2004-2013 VenturaPublications.com and contributors.
|