|
|
|
|
Last Updated: Aug 21st, 2020 - 13:06:35 |
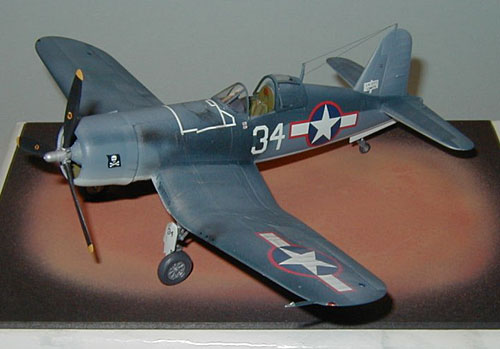
The 1/72 prop contest in ARC gave me the stimulus to add an F4U to my collection. I had been looking at the Corsairs of VF-17 on Bougainville for quite a while as interesting subjects. I chose to build the Corsair of Doris C. "Chico" Freemen because I thought that it had character. It still featured the red outlined national insignia and the painted over previous number on the side and the L.A. City Limits sign on the tail added to the interest. I used the Academy kit of the F4U-1A Corsair for my model.
It is one of Academy's newer kits and features finely engraved panel lines, a reasonable cockpit and assembles easily without major problems. I chose the Academy kit over the one of Hasegawa because Hasegawa did not include the circular refueling panel in front of the canopy.
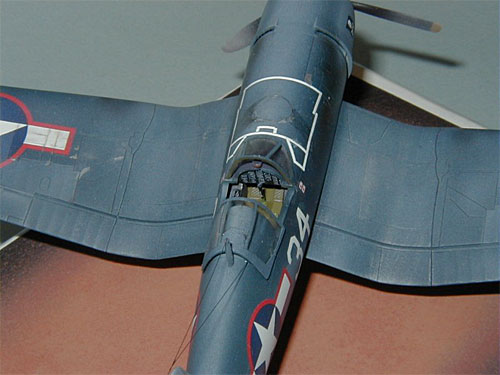
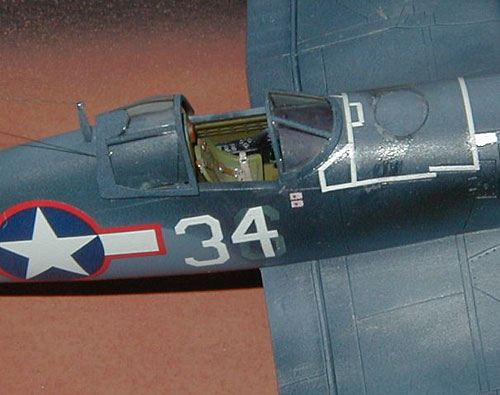
I assembled the kit according to the Academy directions. The cockpit contains finely raised detail that can be easily painted to reflect the actual aircraft. The engine was of simplified design with the second bank of cylinders being molded in bias-relief but they can not be seen from the front of the cowl. I encountered some fit problems with the inserts representing the wing root intakes and coolers. I had to trim the mounting of the parts in order for them to fit correctly within the wing but this was minor. The wing to fuselage joint of this kit is the best that I have ever seen. No filler of any kind was needed. The landing gear contains three parts per side and accurately reproduces the linkages of the F4U. Two canopies are included, an early version with two top frame braces and a later frameless version. The early version was appropriate for the model that I was building. The kit comes with either an external fuel tank or a centerline bomb. The latter comes with a good representation of the Brewster bomb rack. I did not use either of these because I did not see any tanks or exterior ordinance on any photos of the VF-17 Corsairs.
Decals for Chico Freeman's aircraft are available from AeroMaster, 72-082, and EagleCals, 72-20 as well as an old Modeldecal sheet. I chose to use a combination of AeroMaster and EagleCal markings although either could be used in their entirety. I like the way that EagleCal simulate the white tape lines on the aircraft. This allowed them to be applied with some variation as would exist in real life.
I used Testors Model Master enamels to finish the model. Insignia White, Intermediate Blue and Sea Blue were used. I applied Future floor wax as a base to apply the decals and another coat of Future to seal the decals. At this point, I used a very thin wash of oil paints to accentuate the control surfaces and panel lines. When I was satisfies with the wash, I let it dry for a day and then applied a coat of clear flat acrylic to the model. At this point, the model looked like a brand new aircraft, not one of the extremely weathered and well used aircraft from Bougainville. To reproduce the sun fading, I used a very thin coat of white enamel (probably 90% thinner) and slowly fogged the horizontal surfaces of the model. After lightening the upper surfaces, I masked off the control surfaces and applied more of the fading spray to these areas. I felt that the cloth covered surfaces would fade more than the metal surfaces. This same effect was then applied to the fabric covered outer wing panels. Careful use of the fading spray will allow blotching to start to show.
Next, I started to bring out chipped and worn paint. I generally use a combination of aluminum and light gray paint to pick out the chipped paint. I think that it looks more realistic than pure silver paint. I also used a silver Design Spectracolor pencil to pick out smaller details. Finally, I used Tamiya Smoke acrylic paint for various oil drippings on the undersurface and for the spilled fuel area around the gas filler cap.
All in all, I was very pleased with the final result. It is a good representation of the Corsair to add to my collection.
References in order of importance;
Markings of the Aces - US Navy by Charles Graham & Richard Hill - Kookaburra Technical Publications, 1972.
F4U Corsair, Detail & Scale Vol. 55 by Bert Kinzey - Squadron Signal Publications, 1998.
Photo sheet attached to EagleCals 72-20
F4U Corsair in Color by Jim Sullivan - Squadron Signal Publications, 1981.
F4U Corsair in Action No. 29 by Jim Sullivan - Squadron Signal Publications, 1977.
F4U Corsair in Action No. 145 by Jim Sullivan
© Copyright 2004-2015; VenturaPublications.com and contributors.
Top of Page
|
|
|
| Curtiss P-40B (Tomahawk IIA). 1/48th. Trumpeter |
| CMR-182 Boeing Model 40B-4 "US Users" - 1/72nd scale (CMR Models) |
| De Havilland Sea Vampire T.22 - 1/72nd scale (CMR Models) |
| Hughes-1B Racer (double kit) - 1/72nd scale (CMR Models) |
| Mustang MK. IVA. 48th scale, Tamiya |
| Hasegawa 1/48 F4U-5N Corsair |
| The 'Edmonton Special' P-51D Mustang. Hasegawa 1/32 scale |
| F9F-5 Panther, Grumman. 1/32nd, Fisher. Part 1 |
| F9F-5 Panther, Grumman. 1/32nd, Fisher, Part 2 |
| F9F-5 Panther, Grumman. 1/32nd, Fisher, Part 3 |
| RNZAF Avenger |
| P-35A, Seversky - Hobbycraft, 1/48th |
| F3H Demon. Emhar kit EM 3002. 1/72nd |
| RF-84F Thunderflash. Italeri Kit 1108. 1/72nd |
| F-84 G Thunderjet. Tamiya. 1/72nd |
| Convair F-106 Delta Dart. Hasegawa. 1/72nd |
| Boeing X-32 JSF. Italeri Kit 1208. 1/72nd |
| C-46 Commando. Williams Brothers. 1/72nd Kit 72-346 |
| P-39Q/N Airacobra. Academy. 1/72nd. Kit 2177 |
| F4U Corsair. Academy. 1/72nd |
|